Sunday, March 04, 2007

The Race

For ages, there has been an unspoken race that takes place in neighborhoods all across the country. Who will be the first on the block to have fresh warm weather vegetables? Whether it is the first vine-ripened tomato or the first hot pepper, there is something to be said about enjoying the desired fruit before the seed catalog says you can. While some like to attribute this race to the petty competitive nature of suburban housewives, I like to think otherwise.

This race to have the earliest fruit speaks to an integral part of our lives that the land occupies. In the past, diet was not a function of taste and preference, but rather of season and environment. What people ate was directly related to the time of year it was and to the ability of their land to produce. Imagine being so closely tied to the land you tend, that your health is dependent on the outcome of your efforts to make that land productive. What glory.

The signs of spring

Greetings,
So it has been quite some time since my last post. In fact, it is now March and the last time I posted was in October. Since the last entry, much progress has been made, both within the garden and beyond. It is now early march and the first signs of spring are revealing themselves. weather is hitting 50+ and the soil is beginning to thaw out. New bird songs are in the air and I am active in the garden. As noted on the blog, I am located in new england, which is quite cold. For all the new englanders reading, when do you start planting out, either direct seeding or transplanting? Others outside new england, where are you and when do you begin your outdoor gardening activities? What is the first thing that is typically done in your garden, when spring finally begins to reveal itself?

Sunday, October 22, 2006

Jerusalem Artichokes

This morning I planted Jerusalem Artichokes. For those of you that may not be familiar with this vegetable, I will give a brief description:

The Jerusalem Artichoke is grown for its potato-like tubers which can be eaten raw or cooked. They have a sweet, nutty flavor and also contain inulin, which is a beneficial carbohydrate that is especially good for diabetics. The plant itself is a perennial, which grows 6' to 8' tall. It produces a 4" flower that resembles a daisy and has a chocolate scent.


Jerusalem Artichoke Tubers


As you can see, the tubers resemble a potato. They are generally planted in the fall and are ready for harvest the following August, though a few frosts will improve their taste. If the tubers are not going to be planted right away, it is recommended that you store them in a refrigerator, in order to prevent them from drying out.


When you are planting the tubers, you must cut them into 1.5" diameter pieces that contain 1 or 2 'eyes'. The 'eyes' are little bumps that produce the actual sprout. Above is a picture of the tubers after they have been cut and are ready for planting.


Jerusalem Artichoke Bed


I prepared a bed using bricks in order to prevent the Jerusalem Artichokes from moving into other areas of the garden. Because they are perennials, they have a tendency to spread over an area quickly and are difficult to remove once they are settled. Recommended spacing is 12" to 18" apart in rows, but I chose to stagger them and plant them about 10" to 12" apart, given the limited amount of space I have to work with.


This is the bed, once the Jerusalem Artichokes have been planted. The bed lies in the northern most part of the garden because the plants are very tall and would cast shade if they were placed anywhere else. I expect them to sprout in early spring.

Pictures

Below are some pictures of the garden that were taken this morning:

The Garden


The garden has a path running down the middle that separates the two main beds. In the bed to the north lies the cold frame and the soon to be planted Jerusalem Artichokes. The southern bed is where the Winter Rye was Planted.


The Cold Frame


Longways, it runs from West to East and slopes downward to the south, which is towards the front of the picture.


One half of the cold frame has been planted. As you can see, the two rows of Cabernet Small Round Radishes have sprouted (lower two rows). Also, two of the lettuce varieties have begun to sprout. They are at the top of the frame and might be difficult to see.


Winter Rye


This field contains the Winter Rye, though it is hard to see. The rye is a winter cover crop that will be worked into the soil in February or March to increase the supply of available Nitrogen. Once it is worked into the soil, one should wait 3 to 4 weeks before planting, as too much Nitrogen can be detrimental to the plants.

Thursday, October 19, 2006

Sprouts

This morning I noticed that the Winter Rye, which was sown on October 10, is beginning to sprout. Judging by the size and quantity of the seedlings, I suspect that they actually sprouted yesterday. Either way, the seedlings are about 2" tall already and appear to have a reddish color on the tips. I am surprised they even sprouted at all. I did not think they would do well due to the drastic temperature changes recently.

Also, a few of the radish seeds sprouted and some of the Red Romaine Lettuce sprouted as well. Though these seedlings just barely broke through the soil.

Indoor seedlings are all healthy and many of them are showing their first true leaves. I trimmed one of the two onion flats by snipping off the top inch of each seedlings. This is a test to see which flat does better to determine if clipping has an effect. I have not fertilized the indoor seedlings in over 5 days and I haven't fertilized the cold frame seeds since sowing. I plan on fertilizing with the organic kelp extract solution tomorrow.

In terms of the progress of this blog, I got my camera so I plan on starting to upload pictures in order to track the garden visually and reduce the need for complicated descriptions.

Sunday, October 15, 2006

Cold Frame Sowing

This morning I planted the first round of seeds into the cold frame. The cold frame slopes to the south and the long edges run from east to west. I planted each of the following in two foot long rows that run from east to west, each about 2.5" apart from the next row:

- Lettuce, Green Grand Rapids Black Seeded Simpson variety. I planted these about 1" apart and at the northern most spot of the cold frame. Expected time until germination is approximately 3 to 5 days, though it may take longer given the cold weather.

- Lettuce, Green Bib Deer Tongue variety. Again, I planted these about 1" apart. The row is directly below the Green Grand Rapids Variety. Expected time until germination is approximately 3 to 5 days, though it may take longer given the cold weather.

- Greens, Mache/Corn Salad Vit variety. I planted these a little less than 1" apart, directly below the Lettuce, Green Bibb Deer Tongue variety. Mache germinates slowly and will sprout in approximately 10 to 15 days, depending on the temperature.

- Lettuce, Red Romaine/Cos Rouge D'Hiver variety. Again, I planted these about 1" apart, directly below the Mache. Expected time until germination is approximately 3 to 5 days, though it may take longer given the cold weather.

- Another row of Mache below the Red Romaine. See above for details.

- Radish, Small Round Red Cabernet variety. I planted these below the second row of Mache about 1" apart. Expected germination is in 6 to 10 days.

- Another row of Mache below the radishes. See above for details.

- Another row of Radishes below the third row of Mache. See above for details. This row is at the most southern end of the cold frame and the actual wooden frame of the cold frame may block direct sunlight to the seedlings upon germination. This may be a problem.

Notes:
- This spacing might be too tight for all of the lettuce varieties. I plan on harvesting only baby greens so I decided to plant them very close together. Moreover, because it is the winter, I suspect that growth will be much slower than during the peak planting seasons.

- Drastic changes in weather such as moving form hot to cold and vice versa within the same day may cause the radishes to become misshapened.

- After planting, I moistened the soil with a very diluted solution of kelp extract organic fertilizer and water. I then watered more thoroughly with a spray bottle.

- The Plexiglas top of the cold frame was beginning to droop in and creating a place for the cold air to enter. In order to correct this, I made a T shape out of two pieces of wood and stuck it in the soil directly below the middle of the frame where the two halves of Plexiglas meet. Now they are both supported by the T and it is much more insulated as a result.

- Nothing has happened with the winter rye that was sown earlier this week. I am starting to wonder if it will even sprout. One potential source of the problem was that there may be too many roots in the bed that I planted in. I did not have a rake at the time and tried to get as many of them out as I could, but I still find them all over. Today I thoroughly cleared any leftover roots from the cold frame before planting.

As for the indoor seedlings:
- Spinach is still doing poorly, although about 4 seedlings appear to be relatively healthy.
- The first true leaves appeared on some of the Broccoli Raab and Arugula seedlings.
- Onions are doing well, but they need to be thinned very soon. They are becoming overcrowded in the small cells.

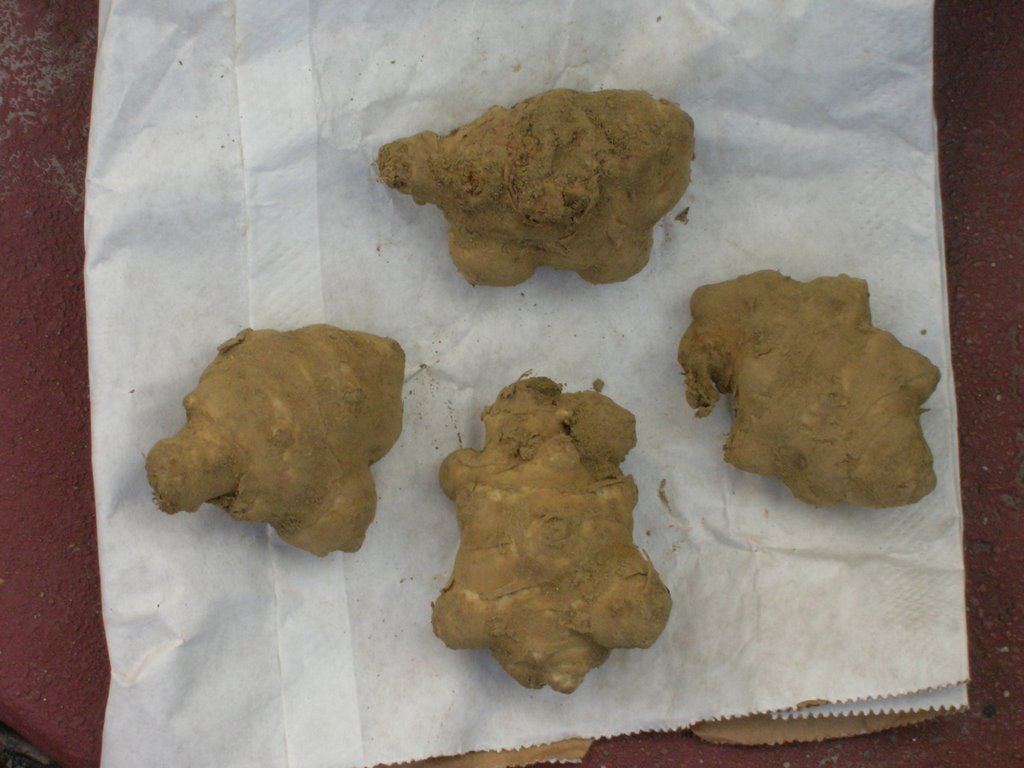
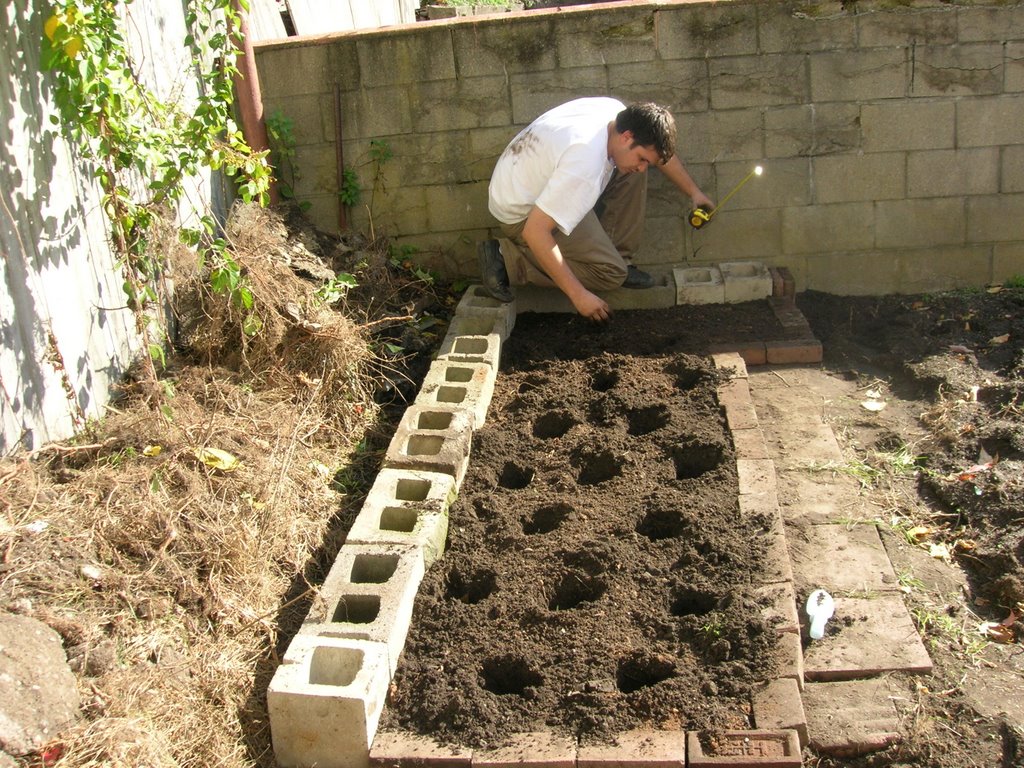
That is about everything for today. I am expecting the Jerusalem Artichokes to arrive in the mail in the next couple of days, upon which I will prepare a bed in the northern part of the garden and plant them.

Thursday, October 12, 2006

New Introduction

This blog has been converted and now is devoted to tracking the progress of my new garden at 160 Transit St., Providence, RI. I will be keeping a log of my activities along with notes about the garden. Goals of the blog are to:

1) Include pictures of all of my activities in order to have a detailed account of my full gardening season

2) Figure out how to import the weather for each day that I post something

3) Post daily in order to fully capture the progress of the garden

Thus far, I have done the following:
- I pulled all of the weeds that were occupying the space that is now my garden. The area was untouched for several years so the plants were all perennials and appeared to have complex life cycles. Moreover, they did a good job fixing the soil, as it was very rich and dark.
- The garden plot is about 13' by 21', or 273 sq. ft.
- I created a path down the center and then I turned all the soil thoroughly using a shovel and a garden hoe. I then worked in about 7 bags or 280 lbs. of shrimp and lobster compost, as well as a decent amount of peat moss.
- I then covered one of the two beds (created by the path) with clear plastic in order to warm the soil. I left it on for 5 nights.

On October 1st, 2006:
- I sowed indoors, 6 cells of each of the following: Spinach, Kohlrabi, Arugula, Broccoli Raab, and Onions.

On October 4th, 2006:
- Broccoli Raab and Arugula plants both sprouted and I thinned them down.

On October 6th, 2006:
- The Onions, Kohlrabi, and Spinach sprouted and I thinned them as well.

On October 10th, 2006:
- I removed the plastic covering from the outdoor bed and sowed approximately 580 Winter Rye seeds. This is a cover crop that will be worked into the soil this coming March. I then recovered the bed with the plastic. The seeds are expected to sprout in 5 to 10 days at 60 degree weather.
- I sowed the Winter Rye very poorly. I broadcast them over the bed in a hurried manner and I accident's sowed some areas very heavily and other areas received barely any seeds. Thus, I will probably have patches of thick Rye and bare patches in the same bed.
- I built a cold frame on this day as well. All of the wood was 2" thick. One piece of wood was cut to be 5' long and 1' tall, one piece was 5' long and 8" tall. The last two pieces were 3' long and one edge of each was sloped so the top was 1' and the bottom was 8". I assembled them into a rectangle using small pieces of wood as reinforcements at the corners. I placed the cold frame on the other outdoor bed, lining the path that I had made. I bought two pieces of plexi glass that fit perfectly over the top to create a sort of miniature greenhouse. I thoroughly turned the soil within the frame and worked peat moss and about 30 lbs of compost into the top 4 inches of the soil.
- For the indoor plants, I fertilized with an organic kelp extract diluted at about 1 part per 1000 in water.

Wednesday, January 11, 2006

Welcome

I have finally decided to create a Blog. I am putting up my first post and going to see how long it takes before Technorati can find it in a search. Sowing Seeds is what i will search for.